DPI vs PPI — the real difference
These two terms are used interchangeably in most design tutorials, which creates a lot of confusion. They refer to two completely different things.
PPI (Pixels Per Inch) is a property of your digital image file. It describes how many pixels are packed into one inch when the image is interpreted for print. A 3000×2400 pixel image at 300 PPI prints at 10×8 inches. The same image at 150 PPI prints at 20×16 inches — same pixels, different physical size.
DPI (Dots Per Inch) is a property of your printer. It describes how many physical ink dots the printer places on paper per inch. A typical professional inkjet printer runs at 1440 or 2880 DPI. It uses that high dot density to faithfully reproduce the pixels in your image — a process called dithering, where multiple CMYK dots combine to simulate each pixel's color.
Why do printers use much higher DPI than the image's PPI?
Because printers only have a limited number of ink colors — typically four (CMYK) or six. To reproduce the millions of colors in a photograph, they use halftoning or dithering: placing tiny dots in patterns that the human eye blends into continuous tones from a normal viewing distance. To create smooth gradients and sharp edges, more dots per inch are needed than the image has pixels per inch. This is why a 300 PPI image is accurately reproduced by a 1440 DPI printer.
The metadata myth — why changing DPI in Photoshop does nothing
This is the most common print mistake in the industry. A client sends a photo. You open it in Photoshop, see "72 DPI," change it to "300 DPI" with Resample unchecked, and send it to print — expecting the problem to be fixed. It is not.
The DPI/PPI value in a digital image file is just metadata — a label telling the printer how to interpret the pixel count. If you have a 1000×1000 pixel image labelled as 72 PPI, it prints at 13.9×13.9 inches. If you relabel it as 300 PPI without resampling, the same 1000×1000 pixels now print at 3.3×3.3 inches. The physical quality at each size is identical — you changed the size, not the resolution.
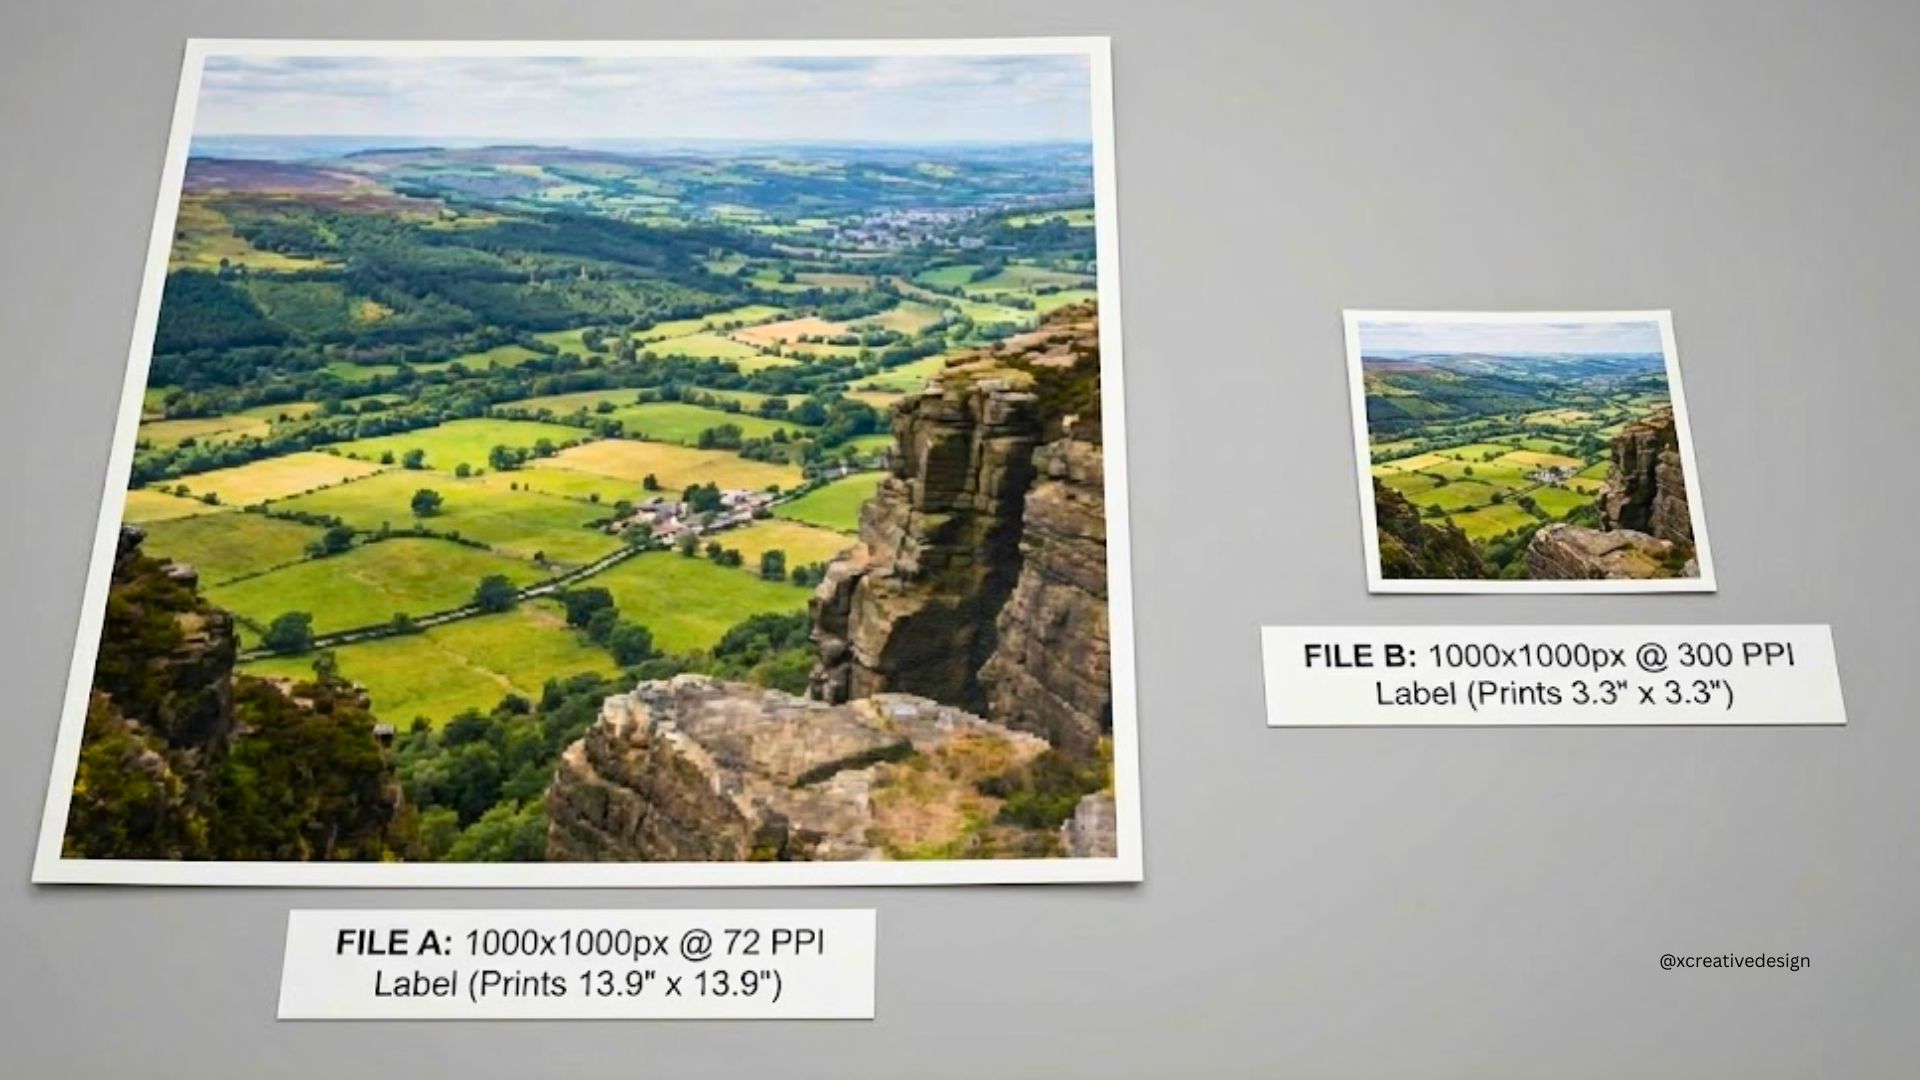
Same pixel count. Identical image quality at their respective sizes. Changing the DPI number only changed the output dimensions — nothing else.
The only way to genuinely improve print resolution is to add real pixels — either by starting with a higher-resolution source, or by using AI upscaling tools that reconstruct detail. Basic Photoshop interpolation adds pixels but produces soft results. AI tools like Topaz Photo AI and Adobe Super Resolution produce significantly better results because they use trained models to predict what missing detail should look like.
What actually determines print quality
Three things determine whether a print looks sharp: pixel count, print size, and viewing distance. The DPI number is just the ratio between the first two.
Viewing distance is the third factor that most calculators ignore. The human eye has a fixed angular resolution — roughly 1 arcminute — which means at greater distances, finer detail becomes invisible regardless of how high the DPI is. A billboard at 40 feet looks perfectly sharp at 30 DPI. The same image on a business card at 30 DPI looks terrible, because you are holding it 12 inches from your face.
This is the core science behind PPQS — the scoring system in our print quality calculator. Rather than applying a single threshold to all prints, PPQS calculates the minimum perceivable DPI at your specific viewing distance:
DPI standards by print medium
The "always use 300 DPI" rule applies to close-range prints on coated paper. For other media and viewing distances, different standards have been established by print industry bodies and confirmed by decades of commercial practice.
| Print Medium | Recommended DPI | Minimum Acceptable | Typical Viewing Distance | Notes |
|---|---|---|---|---|
| Photo print (coated paper) | 300 DPI | 250 DPI | 24 in (arm's length) | Industry standard. Still correct for all close-view prints. |
| Brochures, flyers (uncoated) | 300 DPI | 200 DPI | 24 in | Uncoated paper has ~15% ink spread (dot gain). Higher source res helps compensate. |
| Canvas wall art | 150 DPI | 100 DPI | 48 in (across room) | Canvas texture absorbs detail variation. 150 DPI is the genuine industry standard — not a compromise. |
| Sublimation T-shirt / fabric | 150 DPI | 120 DPI | 36 in | Polyester weave limits perceivable detail. Higher DPI adds file size with zero visible benefit. |
| Sublimation mug (ceramic) | 200 DPI | 150 DPI | 18 in | Glazed ceramic holds detail well. Photo-quality results at 200 DPI. |
| Metal / aluminum panel | 300 DPI | 200 DPI | 24 in | Hard surface retains fine detail. Used for high-end photo display. |
| Vinyl banner | 100 DPI | 72 DPI | 120 in (10 ft) | Viewed from 5–15 feet. 150 DPI also acceptable — confirmed by major banner printers. |
| Trade show backdrop | 100–150 DPI | 72 DPI | 72–120 in | 150 DPI is safe standard. 100 DPI fine for distant viewers. |
| Billboard (roadside) | 15–50 DPI | 10 DPI | 480+ in (40 ft+) | Professional billboard printers work at these DPI values by design. Higher DPI is genuinely unnecessary. |
Viewing distance — the factor most calculators ignore
The human eye resolves approximately 1 arcminute of angular detail. This is a physical constant verified by ISO 8596 optometric standards and used in ophthalmology for visual acuity testing. For print work, it means the minimum DPI you need scales directly with viewing distance.
| Viewing Distance | Min Perceivable DPI | Typical Use Case |
|---|---|---|
| 12 in (30 cm) | 286 DPI | Business cards, book pages, product packaging |
| 24 in (60 cm) | 143 DPI | Photo prints, brochures, standard poster |
| 48 in (120 cm) | 72 DPI | Canvas wall art, framed prints |
| 10 ft (3 m) | 29 DPI | Indoor banners, signage, trade show displays |
| 40 ft (12 m) | 7 DPI | Billboards, large outdoor advertising |
Notice that at 24 inches, the human eye can only perceive a minimum of 143 DPI. So why does the industry standard set 300 DPI for photo prints? Because print involves a safety margin — detail slightly above the perceptual threshold still contributes to the perceived sense of sharpness and quality. The 300 DPI standard provides approximately 2× the minimum perceivable threshold at arm's length, which is the sweet spot between quality and file size.
For canvas wall art at 48 inches, the minimum perceivable DPI is 72. The industry standard of 150 DPI provides roughly 2× safety margin — which is why 150 DPI on canvas genuinely looks excellent, and why photographers selling canvas prints from 12MP cameras are not sacrificing quality.
AI upscaling for print — what works in 2026
If your image does not have enough pixels for your target print size, you have three options: reduce the print size, find a higher-resolution source, or upscale the image. In 2026, AI upscaling has become genuinely useful for print preparation — but it has real limits.
How AI upscaling differs from standard interpolation
Standard interpolation (Photoshop Bicubic, Lanczos) calculates new pixel values by averaging surrounding pixels. It adds pixels but does not add real detail — the result looks soft or slightly blurry at aggressive enlargements.
AI upscaling tools (Topaz Photo AI, Adobe Super Resolution, Magnific AI) use neural networks trained on millions of images to predict what missing detail should look like. Rather than averaging, they reconstruct plausible texture, edge sharpness, and fine detail. The results are noticeably better for print use, especially for 2× enlargements.
| Tool | Max Upscale | Best For | 2026 Notes |
|---|---|---|---|
| Topaz Photo AI | Up to 6× | Portraits, real-world photos, print prep | Industry standard for print. Denoise + upscale combined. Subscription or one-time license. |
| Adobe Super Resolution | 2× (4× pixel count) | Clean RAW files, Lightroom/Photoshop users | Conservative, fewer artifacts on clean images. Free with Creative Cloud. |
| ON1 Resize AI | Up to 10× | Large fine art prints, studio workflows | Strong for gallery and studio output. Perpetual license available. |
| Magnific AI | High — generative | AI art, illustration, stylized work | Adds invented detail — excellent for AI-generated images. Not suitable for documentary photography. |
| Upscayl (free) | 4–8× | Logos, illustrations, line art | Free and open source. Real-ESRGAN based. Excellent for flat graphics and artwork. |
The real limits of AI upscaling
AI upscaling cannot recover detail that was never there. A photo taken at ISO 25600 with severe noise, or heavily compressed as JPEG — both limit what even the best AI can reconstruct. For very degraded sources, the upscaler invents plausible-looking detail rather than recovering real information. This is fine for decorative prints but problematic for archival or precision work.
A practical guideline: AI upscaling reliably improves print quality for enlargements up to 4×. Beyond that, results vary significantly depending on source quality. If you need more than 4× to reach your target print size, finding a higher-resolution source is usually the better path.
Midjourney and AI-generated images — printing in 2026
Midjourney V7 (current as of 2026) produces default images at 1024×1024 pixels for 1:1 ratio. Using the built-in Subtle or Creative upscalers doubles this to 2048×2048 pixels. At 300 DPI, that prints at 6.8×6.8 inches — fine for a photo print but too small for a poster or canvas.
| MJ Output | At 300 DPI | At 150 DPI (canvas) | After 2× AI upscale | After 4× AI upscale |
|---|---|---|---|---|
| 1024 × 1024 px (base) | 3.4 × 3.4 in | 6.8 × 6.8 in | 6.8 × 6.8 in @ 300 | 13.7 × 13.7 in @ 300 |
| 2048 × 2048 px (upscaled) | 6.8 × 6.8 in | 13.6 × 13.6 in | 13.6 × 13.6 in @ 300 | 27.3 × 27.3 in @ 300 |
| 2048 × 3072 px (2:3 ratio) | 6.8 × 10.2 in | 13.6 × 20.5 in | 13.6 × 20.5 in @ 300 | 27.3 × 41 in @ 300 |
For Midjourney sellers on Etsy or Printify, a reliable 2026 workflow is: generate at your target aspect ratio → use Midjourney's Subtle upscale → run through Topaz Photo AI or Magnific AI at 2–4× → verify with the Pixel to Print calculator before listing. This workflow reliably produces files large enough for poster, canvas, and most print-on-demand product sizes.
What is PPQS — Perceptual Print Quality Score
PPQS is the scoring algorithm in our calculator. It was built because standard DPI calculators give you a number but not an answer. A basic calculator will tell you a billboard image has "18 DPI — too low." PPQS will tell you it scores 100/100 — Outstanding, because billboards are viewed from 40 feet and 18 DPI exceeds the perceptual threshold for that distance.
The algorithm combines three inputs that a basic DPI calculation ignores:
Viewing distance
Minimum perceivable DPI is calculated from the ISO 8596 human eye constant (3438) divided by viewing distance in inches. Presets available: close (12 in), standard (24 in), wall art (48 in), signage (10 ft), billboard (40 ft+).
Medium Absorption Factor (MAF)
Each print surface absorbs and reflects ink differently. Coated paper (MAF 1.0) holds maximum detail. Canvas (MAF 0.80) and polyester fabric (MAF 0.75) absorb more ink spread, naturally masking fine detail variation. This is why lower DPI targets are valid on these surfaces — the surface itself compensates.
Medium-aware quality thresholds
The 0–100 score is calibrated per medium, not a single global scale. Canvas at 150 DPI scores Excellent — matching industry standards. A photo print at 150 DPI scores Good — also correct, as it is below the 300 DPI standard for close-range viewing.
Frequently asked questions
Is 300 DPI always necessary for a good print?
No. 300 DPI is correct for close-range prints — photos, brochures, business cards. For canvas wall art, 150 DPI is the industry standard. For vinyl banners, 100 DPI. For billboards, 15–50 DPI. Using 300 DPI for all of these creates unnecessarily large files without any visible quality improvement.
My printer shows 600 or 1200 DPI — should I match that in my image?
No. The DPI shown in printer settings is the printer's dot density — not the image PPI you need to set. A 300 PPI image file will be accurately reproduced by a 1200 DPI printer because the printer uses multiple ink dots to represent each image pixel. Setting your image to 1200 PPI would create a massively oversized file with no perceptible improvement in output quality.
How do I check if my photo has enough resolution for a specific print size?
Divide your image's pixel width by your target print width in inches. That gives you the PPI at that size. Compare it to the standard for your medium: 300 for photo prints, 150 for canvas, etc. Or use the Pixel to Print calculator — it does this automatically, accounts for your viewing distance and medium, and gives you a 0–100 quality score with specific action recommendations.
What file format is best for sending to a print house?
TIFF is the gold standard — lossless, preserves all color, supported by every professional RIP. PDF is preferred for designs with vector elements (text, logos) plus raster images. PNG is a good lossless option for smaller files. JPEG is acceptable for photos at quality 90+ saved once, but is lossy — each re-save introduces compression artifacts. Avoid JPEG for files that will be edited multiple times before printing.
What is the minimum DPI for canvas on Etsy / print-on-demand?
Most print-on-demand services (Printful, Printify, Fine Art America) require a minimum of 150 DPI at the target canvas size. Many accept 100 DPI for larger canvases viewed from distance. Check your specific provider's guidelines, then use the calculator to verify your image meets the requirement for your target size before uploading.